Today is the Fourth Day of Christmas. I had planned on doing tags for each day but all I've managed to get done is Day 1 and that never got photographed or posted. The fact is, I have been having so much fun with my family and friends that I just haven't had the time or the desire to stamp or blog.
I have done some reflecting and can see how blessed I am to have such a wonderful husband, children, family and friends as well as the gift of laughter. No matter how tough things get, there is always some humor to be found. So if I don't post again for a while I want to wish you all a very Happy New Year and a 2010 filled with laughter.
Til next time...

Monday, December 28, 2009
Thursday, December 24, 2009
It's almost here!
 It's 6 AM on Christmas Eve as I type
this. We are having our big family dinner and gift exchange today because our oldest son is a chef and will be working tomorrow. I can't wait to see my husband's expression when he discovers the big surprise I have for him. I am so excited! And NO, all you comedians out there, I am NOT pregnant!
Here are the last of this years cards. This first group features stamps from Waltzingmouse. Upper left: cardstock & ink from StampinUp; paper from Basic Gray; Cuttlebug dotted swiss and holly border embossing folders; icycle border punch from martha Stewart. I began the center piece by stamping the Waltzing mouse Labels4 stamp onto Craft-a-Board, stamping the sentiment inside, cutting and embossing with Spellbinders Labels Four die, dusting the edge with pale green ink then glue and finally adding the Twinklets Diamond Dust. The icicles were also coated in glue and Diamond Dust.
Center Right: Stamps from Waltzingmouse; paper by Basic Gray; Cardstock & ink by StampinUp; Spellbinders Star die; Craft-a-Board; Tsukineko Frost White All Purpose Ink; ribbon & button from stash.
Bottom Left: paper & lace from Webster's Pages; ribbon from Ellen Hutson; cardstock & ink by StampinUp; stamps by Waltzingmouse; Gold embossing powder from JudiKins; Prismacolor markers; Peeled Paint Distress Ink.
 This final group were all inspired by Ellen Hutson and use paper and trims from Webster's Pages and cards with matching envelopes from Memory Box. Additional products used (clockwise from upper left): Angel Stamp unknown, sentiment from Papertrey Ink, ink from StampinUp; Joy to You stamp from Hero Arts, Bramble Wreath from Memory Box, ink & cardstock from StampinUp, Stickles Glitter Glue, Distress Ink, Spellbinders Labels Three; Peace from PSX, cardstock, ribbon & ink from StampinUp, border punch from Fiskars, Glitter by Stampendous, Spellbinders Labels Five die, Distress Ink; Doves stamp by PSX stamped with Memento Tuxedo Black and colored with Prismacolor markers and a white gel pen, Stickles Glitter Glue, Spellbinders Deckled Rectangles die. Both the Angel and Dove cards also have a border drawn with a Prismacolor Metallic Gold marker.
I hope to be able to post my 12 Days of Christmas Tags starting with Day One tomorrow but I'm not making any promises. The plan is to use my Slice and the Mistletoe Design Card as well as leftover papers and trims, various glitters and Tim Holtz finishes to commemorate each day from Christmas to Epiphany. Let's see if Life cooperates.
Wishing you all a very Merry, Peaceful and Blessed Christmas.
Til next time...
Wednesday, December 23, 2009
Laid Back Christmas
 I've taken things very slow and easy this year. I saw no point in making my hands hurt worse than they do so I eliminated many things from the schedule and really enjoyed the things I did manage to do. One of the things I really enjoyed was making my Christmas cards. I only made 2 a day and didn't stress over them. They became the highlight of my Christmas preparations - that and online shopping.
In this first group, the upper left card was made with paper from American Crafts; cardstock, ribbon, ink and ornament stamps by StampinUp; Cuttlebug border embossing folder; Label 4 stamp and sentiment by Waltzingmouse Stamps; Spellbinder's Label 4 die; gold thread.
The bottom left card uses paper from Cosmo Cricket; cardstock, stamps, ink, paper punches and label die by StampinUp; Cuttlebug embossing folder; gold thread; All Purpose Ink in Champagne Mist by Tsukineko.
The final card in this group features a frame cut from Ellen Hutson's Craft-a-Board using a Spellbinder's die which was then sponged with Champagne Mist All Purpose Ink. The deer is a stamp from All Night Media that I have had for years. Other products used were: embossing folder, cardstock, ink, and sentiment from StampinUp; paper from Basic Gray; ribbon from stash.

In this second group, starting with the card on the left, I have a very quick and easy card made using paper and a matching brad from Bo Bunny Press. The cardstock, ribbon, ink, stamp, paper punch and border punch are from StampinUp and the larger scalloped circle punch is from EKSuccess.
The card on the upper right features scoring on the Scor-Pal and a buckle from a Spellbinder's die accented with a Stardust pen. Cardstock, red & green inks, stamps and ribbon are from StampinUp; Spellbinder's large and small oval dies; Antique Linen Distress Ink.
The final card in this trio uses the Dotted Swiss embossing folder from Cuttlebug; Labels Two dies from Spellbinders; Stickles Glitter Glue; Prismacolor Markers; trees from HeroArts; Memento Rich Cocoa Ink; Green Ink, sleigh, sentiment, holly border, oval punches and cardstock from StampinUp.
Til next time...
Tuesday, December 22, 2009
Salt Lake City, New Mexico
Strange title, I know, but there were some strange doings in Salt Lake on Saturday night. It was the Annual Christmas Luminaria Display at a Salt Lake City cemetery. We were invited to a "fun run" through the cemetery followed by food and "Holiday Cheer" at a nearby home. Sorry, but if I ever got this body to run I would end up with 2 black eyes and a possible concussion.
 However, a leisurely stroll with camera in hand seemed quite reasonable and there would be assorted spirits of another kind at the other end so off we went.


However, a leisurely stroll with camera in hand seemed quite reasonable and there would be assorted spirits of another kind at the other end so off we went. Traipsing through the snow, trying to photograph thousands of glowing bags in the cold, foggy dark without functioning opposable thumbs was an adventure in and of itself. Our laughter seemed downright sacrilegious at times with Christopher hopping around, trying not to "step on anyone".  In between our giggles, it was eerily quiet, especially when you consider that this cemetery is sandwiched between 2 somewhat major thoroughfares and there were cars driving through to see the spectacle. To look out and see row after row of flickering candles glowing through the foggy dark was awe inspiring. I can only imagine how incredible it would look on a clear night.
In between our giggles, it was eerily quiet, especially when you consider that this cemetery is sandwiched between 2 somewhat major thoroughfares and there were cars driving through to see the spectacle. To look out and see row after row of flickering candles glowing through the foggy dark was awe inspiring. I can only imagine how incredible it would look on a clear night. 
These photos cannot begin to convey the peace, tranquility and sacredness we felt there. Forget the tree, the decorations, the gifts and all the chaos that is now associated with Christmas. The real Christmas was in a cemetery on a cold, dark, foggy Saturday night.
Til next time...
Monday, November 30, 2009
Post Thanksgiving Post
 Where has the time gone? Where has the year gone? Tomorrow is the first day of December which means in only 32 days it will be 2010. I just can't seem to wrap my mind around it. I've been plugging along, making my Christmas Cards and even photographing them but I just haven't been keeping up with this blog. No shopping or decorating and, usually a night owl, I've been going to bed by 8:30. Weird!
So here is the second of 14 different card designs I've done. I tried to make it clean and simple but it just didn't work out.

Til next time...
Stamps: Papertrey Ink - Peaceful Poinsettia; Signature Christmas
Paper: SU Real Red, Old Olive, Whisper White, Soft Sky; Basic Gray Eskimo Kisses
Ink: Real Red, Old Olice, Soft Sky, Groovy Guava
Other: Martha Stewart Border & Corner Punches; Spellbinders Labels One, Plain Circles, Fancy Labels; Cuttlebug Embossing Folder; Sakura Stardust Copper Pen
Thursday, November 19, 2009
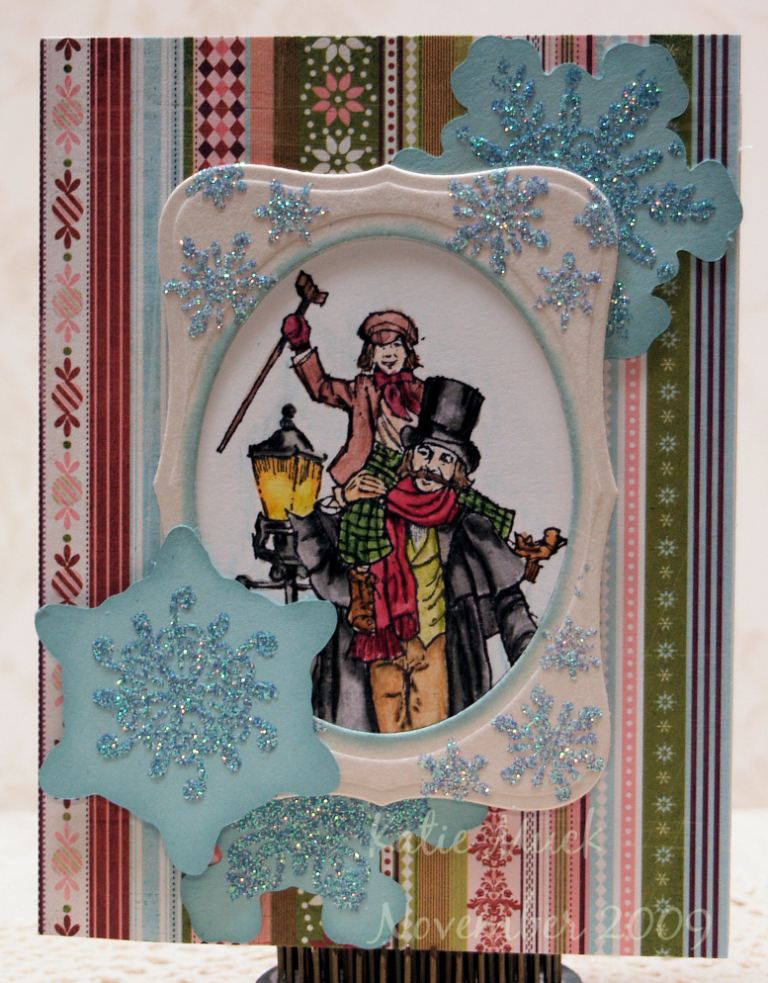
A Dickens of a Time
I had a card all planned in my head. I would stamp snowflakes, cut them out, add glitter and use them as embellishments. It was going to be a great card except my hand wouldn't cooperate so I couldn't cut the snowflakes out. I have a Slice but the snowflakes are lacy so I couldn't stamp on them or so I thought. Then I remembered that Mistletoe is a new MS+ design card which means that I can cut shadows with it. Oh how I love my Slice and my hands do too.
I cut 3 different snowflake shadows in the 2 inch size from the Soft Sky cardstock, stamped the snowflakes with the Glue Pad, placed them face down on the glitter and then ran a 2 inch brayer over them to make sure the glitter was well smashed into the glue.
I cut and embossed the frame out of Ellen Hutsons Craft-A-Board using the Spellbinders dies, sponged some Soft Sky ink around the oval opening, stamped with the glue pad and smashed into the glitter.
I stamped my focal point onto the Neenah Classic Crest with Archival Ink. Once it was completely dry I colored with my watercolor pencils then used my aquapainter to blend the colors.
When doing the final assembly I used a few dimentionals here and there to keep everything level where necessary .
Til next time...
Stamps: SU Keep Christmas, Serene Snowflakes, Winter Post
Paper: Basic Grey 6x6 Paper Pad (Eskimo Kisses); SU Soft Sky; Ellen Hutson Craft-A-Board; Neenah Classic Crest Natural White
Ink: SU Soft Sky; Archival Jet Black
Other: Making Memories - Slice, Mistletoe Design Card; Spellbinders - Labels Eight, Plain Ovals; The Essential Glue Pad; Blue Pastel Glitter (?); Staedtler Karat Aquarelle Watercolor Pencils; Aqua painter
Wednesday, November 11, 2009
Tis That Season
No it's not "The Season" yet but it's that season between Halloween and Thanksgiving when I put my nose to the grindstone and start cranking out my Christmas cards. I've managed to finish 4 different designs so far. Normally I do about 6 different designs in multiples of 8 but this year I came up with so many ideas that I am making 2 of each until my mind runs dry and then I'll make more of my favorites.
 It all begins with a sketch. I toss all the newest stamps, papers, ribbons, dies, embossing folders etc. onto my workbench then pick up my pencil and my notebook and sketch out what I am going to do with it all. I add notations as to which stamp, paper or whatever I have in mind for each particular sketch because nothing is more frustrating then having a whole project worked out in my head only to have it gone the next time I open my book and look at the sketch.


It all begins with a sketch. I toss all the newest stamps, papers, ribbons, dies, embossing folders etc. onto my workbench then pick up my pencil and my notebook and sketch out what I am going to do with it all. I add notations as to which stamp, paper or whatever I have in mind for each particular sketch because nothing is more frustrating then having a whole project worked out in my head only to have it gone the next time I open my book and look at the sketch. As I actually create the card, I record measurements, colors, supplies etc. on the sketch in case I want to recreate it later. I use scratch paper from my printer when testing dimentions so I don't waste any of the good stuff or at least that is the plan. It doesn't always work that way. I took this photo just to show everyone that my work area does get messy. It doesn't always look like it does here.
Here I am testing a layout before I actually apply the adhesive just in case I need to do any last minute adjustments. Those are my thumb braces to the left of the layout board. They aren't doing much good sitting there instead of being on my hands. Looks like I'll be getting my money's worth when I have my surgery in January.
Til next time...
Friday, November 6, 2009
Harvest Blessings
 Here is another card made in September that never made it to the blog. I think because my Mojo went Walkabout in September and my cards showed it. I used Verve's Harvest Blessings stamp set and SEI's Mimosa paper with a bit of ribbon from my stash. Here is proof that you can have beautiful stamps and beautiful paper and still end up with a lousy card. The wreath was stamped in brown and colored with Prismacolor markers but you can't see the shading because the markers bled too much on the SEI paper.
Til next time...
Thursday, November 5, 2009
Scoring Techniques
 I wasn't feeling too well the night of October's Card Club meeting so I stayed home. If I was coming down with something I didn't want to spread it to the rest of the group and besides, my SU Demo is one of my closest friends. By Saturday I was feeling fine and she needed to use my sewing machine so she just brought everything I needed to complete the projects over with her.
The technique page was fairly simple. I just had to use my Scor-Pal to score a grid on the 6x6 background piece, a border design on the 1.5x6 band, punch out the labels, attach the ribbon to the band and assemble. I sponged some Dusty Durango and Soft Suade onto the background piece, dusted the edges of everything with the same two colors but that grid was just begging for a little something extra so I used some small motifs from 2 Papertrey Ink sets and stamped them in Dusty Durango, Soft Suade and Creamy Caramel. NOW it was ready for assembly.
For the card, I scored the grid onto the Creamy Caramel and then dusted with Vintage Photo Distress Ink, wrapped the ribbon around it and then mounted it to the card front. The sentiment was stamped onto Very Vanilla with Chocolate Chip then punched out with the large oval punch and attached to Pumpkin Pie and Dusty Durango ovals cut with the same punch. All ovals were dusted with Vintage Photo, a crystal brad attached just below the sentiment and then the unit was mounted to the upper left corner of the card.
The pumpkin vignette was stamped on Very Vanilla with Stazon Black then watercolored with a blender pen and SU markers. It was then cut out, mounted to Dusty Durango, cut out again slightly larger, dusted with Vintage Photo then mounted to the lower right of the card. The final touch was a ribbon knot attached just to the left og the vignette. There was also a Christmas card but I spilled something on it so...
Til next time...
Stamps: Papertrey Ink- Simply Stationery, Background Basics Stars; SU Holiday Best, Gifts of the Earth.
Ink: SU Dusty Durango, Soft Suade, Creamy Caramel, Chocolate Chip; Stazon Black; Vintage Photo Distress Ink.
Paper: SU Very Vanilla, Creamy Caramel, Pumpkin Pie, Dusty Durango.
Other: Scor-Pal; SU Large Oval, Modern Label Punches, Dusty Durango Ribbon, Blender Pen, Markers and sponge.
Wednesday, November 4, 2009
Emboss Resist Swap
 I just love this technique and I love these colors. I recently bought SU's Razzle Dazzle after it finally dawned on me that it coordinates so well with all the "Bella" sets and it insisted that I ink it up. I used White Craft ink and Sparkle embossing powder on Very Vanilla then cut it out with a Spellbinders circle die. The border piece, which was done with Bella's Border Wheel used the same ink and embossing powder and was very easy to center since all my wheels are unmounted. I sponged a combination of Pale Plum, Perfect Plum and Bashful Blue on both pieces then cleaned off any excess ink with a paper towel. The Very Vanilla card was embossed with SU's Flourish Embossing Plate. The Rich Razzleberry pieces were cut out then embossed with the Cuttlebug Textile Texture embossing folder. For the Card Club Swap I stamped "For You" in Rich Razzleberry on Bashful Blue, cut out with an oval punch then mounted to a slightly large Very Vanilla oval. The day after Club, my Fancy Tags die set arrived. Isn't that always the way? I just had to see how it would look so I stamped my sentiment in Rich Razzleberry on Bashful Blue, die cut and embossed it then, while it was still in the die, I used a sponge dauber with Rich Razzleberry to lightly dust the center oval and darkly ink the designs on the sides of the tag. I just mounted it over the excisting ovals which gives it a dimentional look.
Til next time...
Stamps: SU Razzle Dazzle, Bella's Bloom, Bella's Border Wheel, Great Friend
Ink: SU Craft White, Rich Razzleberry, Perfect Plum, Pale Plum, Bashful Blue
Paper: SU Very Vanilla, Rich Razzleberry, Bashful Blue
Other: SU Photo Corners & oval punches; Spellbinders plain circles, Labels 3, Fancy Tags; Cuttlebug Textile Texture embossing folder; SU Flourish Embossing Plate; Hero Arts Sparkle embossing powder; sponge daubers & papertowels.
Tuesday, November 3, 2009
Just not my color combination
 It's official! Black and White is not a color combination that works for me. Perhaps it's because I just don't consider black or white to be colors. I don't know but I just don't work well with them so this may be my final attempt. I believe this was a Verve Challenge from back in September and the only thing I like about it is the Stamp set and the glittery embossing powder I used. Oh and my bows came out pretty darn good too. LOL
Til next time...
Stamps: Verve - Starstruck; SU Polka Dot Background
Ink: Versamark, Versamark Dazzle Frost, Memento Tuxedo Black
Cardstock: SU Black, Neenah White
Other: Spellbinders Octagon Dies; Cuttlebug Embossing folders; Embossing Powders and Ribbons from my stash- origin unknown
Monday, November 2, 2009
Working on Website
Sorry, no card post today although I did do the photography for several projects I will be posting this week. Today I started on a website so I can upload photos of my craft room and other stuff. It's a very rough draft so far but it is up and running so pop on over to Paper Musings, the Website and take a gander at my craft room.
Saturday, October 31, 2009
Emboss Resist
 September's Card Club Technique was Emboss Resist. For the technique, we rolled the Stamping Wheel in Versamark, rolled it onto Glossy cardstock,embossed with clear embossing powder,brayered on black ink then wiped off excess ink with tissue.
To complete the card, the sentiment was stamped with black ink on a piece of Dusty Durango which was then mounted to a piece of Going Gray. I dusted with edges with Basic Gray then attached 2 black brads near the bottom. The Haunted House was stamped with Black ink on a piece of Basic Gray then colored with Watercolor crayons and an Aquapainter. The edges were dusted with Basic Gray then the piece was mounted to a piece of Going Gray that was dusted with basic Gray. The tree with owl was stamped 3 times across the top of the card with Basic Gray ink.
To complete the technique page I stamped a background in Basic Gray using stamps from Inkadinkadoo and dusted the edges with Basic gray. The spider web and haunted house were cut using the Spook Alley Design card in my Slice. The instruction piece was dusted with Lovely Lilac.
Til next time...
Stamps:SU-Haunted Hill Wheel, House of Haunts set; Inkadinkadoo
Ink: Versamark, Basic Black, Basic Gray, Lovely Lilac
Paper: Basic Gray, Going Gray, Lovely Lilac, Basic Black, Barely Banana, White,
White Glossy, Dusty Durango
other: Clear Embossing Powder, Brads, Paper Piercer, Brayer, Watercolor Crayons,
Aquapainter, SU Black Grosgrain, The Slice, Spook Alley Design Card.
Friday, October 30, 2009
September Swap Using August Technique
 Our Card Club Swap for September had to use the technique we did in August which was Masking & Reverse Masking. I got a little carried away with it and used 3 masks but it was fun and rather easy once I got the sequence down. I used my Spellbinders dies and Eclipse tape to make my masks. I covered a scrap of cardstock that was 4 1/4 X 5 1/2 with the Eclipse tape then centered the scalloped oval face down on it. I taped the die down with removable tape to hold it then centered the plain oval die inside the oval and taped it in place before running the whole thing through my Big Shot. To make the card, I covered the front with the 4 1/4 X 5 1/2 inch mask and the scalloped mask, leaving just the center oval uncovered. I stamped the grapes in Adirondack Espresso and sponged the other edges of the oval with Antique Linen Distress Ink. I applied the oval mask to the center then removed the scalloped mask. I sponged the scalloped band with Sahara Sand, stamped the crackle in Sahara Sand then replaced the scalloped mask. Finally I removed the largest mask, stamped the scroll in Rich Razzleberry,distressed with Antique Linen nearest the scallops and Walnut Stain and Rich Razzleberry around the outside edges then removed all masks. I colored the grapes with Prismacolor markers and outlined the scallops with SU's Sahara Sand and Soft Suade Markers.
Stamps: SU-Fruit Stand, Baroque Motifs; Stampers Anonymous Crackle Creative Block
Ink: SU Rich Razzleberry, Sahara Sand; Distress Antique Linen, Walnut Stain
Other: Spellbinders Scalloped and plain ovals; Eclipse Tape; SU Markers- Sahara
Sand, Soft Suade; Prismacolor Markers- 147, 129, 168, 197,187,28
Ink: SU Rich Razzleberry, Sahara Sand; Distress Antique Linen, Walnut Stain
Other: Spellbinders Scalloped and plain ovals; Eclipse Tape; SU Markers- Sahara
Sand, Soft Suade; Prismacolor Markers- 147, 129, 168, 197,187,28
Thursday, October 29, 2009
Autumn Technique
 This year, at our Stampers 10 Card Club, we are doing 6x6 Technique Pages each month along with a project that uses the technique. Then we have to use the technique for our Swap for the following month. Our first meeting of the year was in August and our technique was masking. I did most of my stamping at club then took everything home for assembly because I had a few changes I wanted to make (so what else is new) I used the large wheat stamp from JidiKins for my page background and dusted the edges of the instructions with the same inks as used in the sample. I trimmed my sample piece down so it would fit on the page better, snipped with a notched corner punch, wrapped it with pearl cotton then mounted it to Chocolate Chip. I left the masked piece full sized for the card but I liked the look of the pearl cotton so I repeated it for the card.
Stamps:SU-All Holidays, Autumn Days, Farm Life; Judikins-Wheat Sheaf
Paper: Crushed Curry, Dusty Durango, Soft Suade, Chocolate Chip, Very Vanilla
Ink:Crushed Curry, Dusty Durango, Soft Suade, Chocolate Chip
Other:SU Ribbon, Scallop edge and Notch corner punches,Brads, Paper Piercer & DMC Pearl
Cotton
Wednesday, October 7, 2009
Grateful
 I've been playing with more of my Papertrey Ink stamps. I really like their sets and need to use them more. This card was made using their "First Fruits" set and Splitcoast's SC245. The main card was stamped using SU's Aida Cloth on Dusty Durango with Soft Suade. The horizontal panel was stamped repeatedly with a stamp from First Fruits on River Rock with Soft Suade and looks like printed paper when done. The right side of the piece of Apricot Appeal was cut with a Kaleidoscope Border Die from Spellbinders and sponged with Dusty Durango while the border die was still in place. The wheat was stamped with Soft Suade onto Naturals Ivory then cut out with a Spellbinders Labels 4 Die and edged with Dusty Durango.
I wanted to wrap the ribbon just around the panels and not the main card front so the panels had to be assembled first. I laid the card front down then covered it with a page protector and assembled the rest of the card on top of the page protector. Once the panels were assembled I peeled them off of the page protector, wrapped my ribbon around this unit then mounted it to the card front. To finish the card, I stamped the sentiment onto Naturals Ivory in Dusty Durango, punched it out with SU's Modern Label punch, dusted the edges with Dusty Durango and mounted to the bottom right with Dimentionals.
Til next time...
Wednesday, September 30, 2009
Happy Harvest

I love everything about fall. The cold crisp nights, the colors, picking the last of the vegetables in the garden and watching the chrysanthemums bloom. I guess that is why I've been hoarding this paper from Basic Grey's "Mellow" series. After all, it screams "Fall" and if I use it, I won't have it anymore. Don't you just love my logic?
I paired the Basic Grey paper with SU's Riding Hood Red, Kiwi Kiss and Pumpkin Pie along with a piece of burlap run through the Xyron. The card is patterned after Splitcoast Stampers' Sketch SC243. The stamps are from Papertrey Inks' Vintage Picnic stamped with Memento Black on Neenah Classic White and colored with Prismacolor Markers. All pieces were dusted with Walnut Stain Distress Ink.
I paired the Basic Grey paper with SU's Riding Hood Red, Kiwi Kiss and Pumpkin Pie along with a piece of burlap run through the Xyron. The card is patterned after Splitcoast Stampers' Sketch SC243. The stamps are from Papertrey Inks' Vintage Picnic stamped with Memento Black on Neenah Classic White and colored with Prismacolor Markers. All pieces were dusted with Walnut Stain Distress Ink.
If anyone is interested in a list of the Prismacolor Marker colors used, please let me know.
Til next time...
Friday, September 25, 2009
Reversed Acorn
 Did you know that acorns are dark and the little hats are light? Obviously I didn't until I looked at a neighbor's oak trees but I think my version is prettier. Isn't this just the cutest acorn? I keep wanting to put eyes and a goatee on it. It's from Papertrey Inks First Fruits set. The card is based on Splitcoast's sketch SC242 but I made a minor change to make the final card more balanced. The background was stamped with SU's Woodgrain stamp then sponged with Creamy Caramel and Walnut Stain Distress Ink. The cardstock used was SU's Always Artichoke, Confetti Cream and Creamy Caramel and the inks were SU's Always Artichoke, Chocolate Chip, Creamy Caramel and Distress Walnut Stain. Spellbinders Rectangle dies were used for the center 2 panels and their mats. The Flourished leaves on the side panel are from Papertrey Inks Fall Elegance and the rest of the stamps used are from their First Fruits set.
Til next time...
Thursday, September 24, 2009
Sunflowers
 I love making my own background papers. Yes it is time consuming and prone to failure but there is so much satifaction when it comes out right. For this card I pulled out my old Stamp-O-Graph from Mostly Animals. It was billed as a Stamp Positioner and Image Enhancer and was real handy for stamping the same images on multiple cards. The stamp positioner is attached to a gridded base with hinges so you can attach your card to the base, stamp it with the positioner, flip the positioner out of the way, work on your card then flip the positioner back into place and re-stamp your card. Clear as mud huh? So...
I stamped the background stamp onto the gridded base with the stamp positioner in place to see exactly where my design would land then, using a repositional gluestick I attached my Handsome Hunter card front into position then stamped the background onto it. I then flipped the positioner out of the way and colored the background with Prismacolor pencils. When you color a detailed design with colored pencils you tend to lose the detail so this is where my Stamp-o-Graph earns its keep. I flipped the positioner back into place and re-stamped the image OVER the pencil coloring which adds the detail back in. I may not use it every day since the Stamp-a-ma-jig is quicker but no way would I ever give up my Stamp-O-Graph.
I used Splitcoast Stampers Sketch Challenge 244 for the basis of this card. I stamped the More Mustard panel with a text background from Papertrey Inks Background Basics Text Style in Close to Cocoa. After sponging Walnut Stain Distress Ink around the edges I matted it with Close to Cocoa cardstock also sponged with Walnut Stain. I attached a round clip tied with natural twill ribbon to the top corner then mounted it to the card front. I stamped the pitcher full of sunflowers from Papertrey Inks Autumn Abundance onto Neenah Natural White with Memento Black ink then colored them with Prismacolor Markers. I clipped the 4 corners of this piece as well as the corners of the Close to Cocoa mat with the ticket punch from SU, sponged all with Walnut Stain ink then mounted to the card. Attached an antique turn button to balance it all out.
Til next time...
Tuesday, September 22, 2009
(Girl)Friends
 Verve's sketch for the 3rd week of September was with a twist of girlfriends. This card isn't girly but all the girls liked it so that's good enough for me. I used SU's Mellow Moss and More Mustard cardstock with patterned paper from We R Memory Keepers. I stamped the hot air balloon with Memento black ink on the reverse side of the patterned paper, colored it with Prismacolor markers and cut it out with a Spellbinders circle die. All pieces were aged with Distress Ink in Tea Dye. Mounted the largest printed piece to the card base then outlined it with a gold Stardust Pen by Sakura. Pierced holes on each side of the striped piece, cross stitched with gold thread then mounted across the middle of the card. Stamped the sentiment from Verve's Because of You in Chocolate Chip ink onto the bottom half of the Mellow Moss piece. Mounted the Mellow Moss piece then mounted the circle piece over it with Dimentionals.
Til next time...
Monday, September 21, 2009
It's sketch time Verve Style!
 For the first sketch of September I tried to keep things clean and simple. The twist was "little round things" so I chose polka dots and balloons. The card base is SU's Not Quite Navy with a panel of Neenah's Classic White. I cut panels of Barely Banana, Bashful Blue and Gable Green, stamped them with the polka dots from Verve's Bountiful Backgrounds in their respective ink colors then edged them using the large scallop border embossing punch from EKSuccess. I layered the scalloped panels, wrapped white grosgrain ribbon from Michael's around the top, attached a partial bow with a pearl brad from K & Company then attached the unit to the white panel.I stamped the balloons from Verve's Party Time on a small white panel in Memento black ink then colored them with Prismacolor Markers,matted it with Bashful Blue and mounted it to the top right corner of the card. Stamped the sentiment from Party Time on the bottom left in Bashful Blue. I can NOT believe I created a card with absolutely NO disressing!!
Til next time...
Sunday, September 20, 2009
Back in the Saddle
It has been 3 weeks since my last post and I need to pick myself up and get going again. Life is too short to waste and Shirley would tan my hide if I stayed in my shell any longer. To jumpstart this blog I am reposting the card I made for her family with details this time.

The floral vine is from a gorgeous set by Papertrey Ink called With Sympathy. The butterfly is from a Verve set called Enjoy and the sentiment is from StampinUp. Shirley loved Pink or Peach with green so that was my color scheme.
The cardstock I used was SU's Blush Blossom, Always Artichoke and Groovy Guava as well as Neenah's Classic White. I stamped the vine with SU's Always Artichoke and the flowers with Dusty Durango then colored with Prismacolor markers.
The label was cut from Blush Blossom using Making Memories Slice and the Studio Essentials design card. I stamped the sentiment in Always Artichoke, dusted the edges with Blush Blossom and attached the label with crystal brads that were colored with a Prismacolor marker. The butterfly was stamped with Groovy Guava, Dusty Durango and Chocolate Chip then cut out. I stamped the antennae in Chocolate Chip directly onto the card front then mounted the butterfly in place with Dimentionals.
I have a handful of cards and things that I have worked on over the last few weeks that I will be posting over the next week or so. Several sketch challenges from Splitcoast and Verve, 2 technique pages from this years Stamp Club as well as the projects from Stamp Club. Hope you come back.
Til next time...
Sunday, August 30, 2009
Rest in Peace Shirley
 On August 20th a very special person in my life passed away. Dollhouse Miniatures first brought us together but love and friendship kept us that way and that love continued to grow and strengthen over the years in spite of a 27 year age difference.
She came into my life at a time when I so desperately needed a friend and mentor. She knew what it was like to be an only child and to have a mother who wasn't there to lean on and seek advice from. She knew what it was like to raise boys, to try and cope with a difficult child and to live with near constant pain. She knew what it was like to have to give up friends and family and move to Utah because of a husbands job. She knew all this and shared her experience and wisdom with me. And when
 I was feeling trapped and isolated she made sure I knew I had a home to go to and a person to turn to.
Tomorrow, August 31, 2009, she will be laid to rest but her love, her laughter and her zest for life will live on in my memories and in my heart forever. I have been so blessed to have called her friend, sister, and mother.
Farewell Shirley. I know you are at peace and have reunited with Joe. I will miss you.
Til next time...
Tuesday, August 25, 2009
The Perfect Sentiment
 Today's card is for Week 4 of August's VLV Sketch with a Twist, the Twist being to use a favorite color combination. This designer paper is from the Porcelain series by Basic Gray. I paired it with SU's Cameo Coral, Barely Banana and Chocolate Chip. I tried not to make it too girlie because the moment I came across this sentiment from Verve I just knew I had to use it and give this card to my husband. Last night I heard him open the envelope and then he joined me in the living room. He didn't say a word but I got a very long, long hug. The card said it all.
Stamps: Verve -Enjoy, Because of You, Bountiful Backgrounds
Paper: DSP- Basic Gray; SU - Cameo Coral, Barely Banana, Chocolate Chip
Ink: SU- Cameo Coral, Chocolate Chip, Always Artichoke
Other: Spellbinders Oval dies
Friday, August 21, 2009
Thankful Thoughts
For the 3rd week of August, Verve's VLV with a Twist challenge was to use tags. I added an additional twist of my own by making myself use something from my vast collection of "Why the heck did I buy this?" items. I chose to use some paper from one of those ginormous pads from Provo Craft. These are the first 2 sheets to ever be pulled from this pad! I also threw in a BIBHUIY (Bought It But Haven't Used It Yet). I bought the Tim Holtz mini stapler thingy with a box of additional staples the minute it hit the retail market but of course it hasn't seen the light of day since the purchase.

To coordinate with the printed paper, I chose Always Artichoke, Pink Pirouette and Rich Razzleberry. I cut the tag with a Cuttlebug die but it looked rather plain next to the scallop layers of my focal point so I mounted a scalloped circle onto the tag. Threaded some ribbon through the tag and used one whole mini staple from my stash. It worked rather well and it doesn't look tacky like office staples do so I just may get some use out of this "tiny attacher".
My sentiment is one of the free stamps I got for ordering from Verve and it got me thinking about the things I am grateful for. First and foremost is my husband, whose love, devotion and unswerving conviction that I can do anything has made me who and what I am today. Another thing I am grateful for is my card club. Last night was our first meeting of the new year. I shared the "overflow" table with a new member who is a delightful woman and I am so glad she has joined our little group. Shared thoughts and ideas about "Copics vs Prismacolor" with another new member who fits right in. And then there are the returning members who are now my friends and confidants. Those very special friends with whom you can share not only techniques and ideas for stamping, but your personal joys and sorrows. I am grateful for this group of very special women and look forward to another year of sharing.
Til next time...
Stamps: Verve
Paper: SU Always Artichoke, Pink Pirouette, Rich Razzleberry; Provo Craft
Ink: SU Always Artichoke, Rich Razzleberry
Other: SU Ribbon; Spellbinders plain & scalloped circles; Cuttlebug tag; Tim Holtz Tiny Attacher; SU Dimentionals
Thursday, August 20, 2009
Verve-a-licious!
Managed to squeeze in some stamping time and I am doing the happy dance.  Using the Viva la Verve Sketch Challenge with an Edgy Twist for Week 2 of August, I came up with this little number. I stamped the background piece with Versamark Dazzle in Frost and I just wasn't dazzled. Fortunately the ink stayed tacky longer than I expected so I was able to dig out a jar of Pearl embossing powder, sprinkle it on and have it stick. It looked really cool besides until I realized that I had to try to stamp a sentiment onto that embossed background. Back to digging into the 3 drawers of embossing powder that I was going to get rid of. Ha!! My hoarding has been justified!! So a little punching here, some embossing there, some ribbon and a bow and I ended up with a very presentable card.
Til next time...
Stamps: Sonlight Crackle Backgrounder, Verve
Paper: SU Elegant Eggplant, Almost Amethyst; Curious Iridescent Cryogen White
Ink: SU Elegant Eggplant; Versamark Dazzle
Embossing Powder: Judikins Pastel; Ranger Adirondack Eggplant
Other: EK Success Border Punch; Spellbinders Plain and Scallop Ovals
 Using the Viva la Verve Sketch Challenge with an Edgy Twist for Week 2 of August, I came up with this little number. I stamped the background piece with Versamark Dazzle in Frost and I just wasn't dazzled. Fortunately the ink stayed tacky longer than I expected so I was able to dig out a jar of Pearl embossing powder, sprinkle it on and have it stick. It looked really cool besides until I realized that I had to try to stamp a sentiment onto that embossed background. Back to digging into the 3 drawers of embossing powder that I was going to get rid of. Ha!! My hoarding has been justified!! So a little punching here, some embossing there, some ribbon and a bow and I ended up with a very presentable card.
Til next time...
Stamps: Sonlight Crackle Backgrounder, Verve
Paper: SU Elegant Eggplant, Almost Amethyst; Curious Iridescent Cryogen White
Ink: SU Elegant Eggplant; Versamark Dazzle
Embossing Powder: Judikins Pastel; Ranger Adirondack Eggplant
Other: EK Success Border Punch; Spellbinders Plain and Scallop Ovals
Wednesday, August 19, 2009
Curious Cat and a Major Booboo
Last week I got out my Parchment Craft tools and proceeded to make my wonderful husband a new bookmark to replace the one he lost. I decided to make one with his Zodiac sign, Libra, and his initials. Oh how beautiful it came out but I decided to back it with some cardstock which is usually no problem. There is a spray adhesive specifically for vellum and it works like a charm. Hmmm... let me rephrase that. It works like a charm if you do not get sidetracked and use the wrong can!!! Yep, you guessed it. I grabbed the wrong can and used regular spray adhesive which can be spotted by a blind mouse from 30 yards away.
Oh well, stuff happens so I went ahead and set up to photograph it. I guess Bailey must have smelled those blind mice because he came along and crashed (literally) my little photo session.
 So now I am making a "New" new bookmark to replace this mess and will limit my photo sessions to afternoon naptime. Live and learn.
Till next time...
Oh well, stuff happens so I went ahead and set up to photograph it. I guess Bailey must have smelled those blind mice because he came along and crashed (literally) my little photo session.

 So now I am making a "New" new bookmark to replace this mess and will limit my photo sessions to afternoon naptime. Live and learn.
Till next time...
Thursday, August 13, 2009
AWOL from Extreme Conditions
Sorry to be gone so long but things just got in the way again. Last week I was given a cortisone shot in my hand. NOT a pleasant experience in the least and I honestly can't remember the rest of the week after that! LOL And the shot didn't do much good either. Bummer!!
Saturday I went to a friends Open House/Stamp Sale and I was her best customer (no surprise there). She was getting rid of last years SU In Colors which I hadn't bought so I got everything - pads, reinkers, 2 packs of Pink Pirouette cardstock - for a great price along with a Hostess set that I somehow missed, a few brass embossing templates and other miscellaneous stamp sets. A great haul!! Sunday we went down to Riverton for a wonderful visit with some friends. It has been so long since our last visit that I almost forgot just how much I love being with this couple.
Monday I had a visit from a delightful woman who needed some instruction on Parchment Craft Techniques. Somehow she found me through the Internet and gave me a call. It looks like I will be picking up my needles and embossers again. In fact, that is what I've been doing off and on for the last 2 days - making my husband a new parchment bookmark to replace the old one that he thinks he left in a library book. Throw in a visit to the dentist, gardening, canning bushels of string beans, reading a darn good book and all the other assorted things I do around here and there is my week so far.

And while doing all of the above, I have to contend with this obstacle. Now just how am I supposed to get anything accomplished while working under these extreme conditions??? If I can work around this beast I will be posting my Technique Junkies One for One Swap for July, the Parchment Bookmark once it's done and hopefully getting around to this weeks Sketch Challenges.
Til next time...
Thursday, August 6, 2009
First Mojo Monday Sketch
I finally made my first card using a Mojo Monday sketch. I don't know where the rest of you begin a project but I usually start mine with a sketch. From there it depends on what the card is for. If there is a particular theme, then I will pick out the stamps and then the color scheme. If it's a WTH kind of card then sometimes I'll pick out my colors first but I almost always start with a sketch. MOJO98 looked like an interesting one so I jumped in.
I ended up picking out my color scheme first on this card because I wanted to use some printed paper for a change and this piece from SU caught my eye. You can probably guess, since this design is 2+ years old, that I am a paper hoarder. The choice of using Wild Wasabi and Soft Sky were pretty much a no brainer since those were the colors in the print. Groovy Guava was never my favorite color but it added such pizzazz and it combined perfectly with Dusty Durango. So on to the stamps.
I looked at all the catagories of stamps I have and pulled down the 2 Step Stamping Binder on a whim. And yes, all of my stamps are unmounted, stuck to page protectors and stored in binders by categories. After flipping through a few pages I came upon this SU set called Flowers for a Friend. It just sort of jumped up and said "Use me and I will look so nice with those new punches that you just had to have and haven't used yet" so use them I did along with those punches.
After fiddling and fussing for a while this is what I ended up with. The sentiment, from JustRite Stampers was an afterthought that worked out rather well. I used a StampinUp Texture Plate on the Wild Wasabi base but it wasn't very deep. If anyone knows how to get a better impression with these please let me know.
Til next time...
Stamps: SU, JustRite
Paper: SU Wild Wasabi, Soft Sky, Dusty Durango & SU DSP
Ink: Wild Wasabi, Certainly Celery, Blue Bayou, Soft Sky, Dusty Durango, Groovy Guava
Other: Spellbinders circle dies; Martha Stewart Corner Loop and Edger Loop Continuous Edge punches; SU ribbon; SU Dotted Texture Plate
Tuesday, August 4, 2009
Happy Heritage
 I have wanted this set from Hero Arts the moment I first saw it. I am half Polish and my husband is half Russian so these Matryoshka dolls have a lot of sentimental value. We have several sets of the real thing that my husband brought home from Russia. They are so amazing and now I have a stamp set as well thanks to Terry Redmond at More Than Ink
Til next time...
Stamps: Hero Arts Dolls; Sonlight Backgrounder; Inkadinkado sentiment
Paper: SU Barely Banana, Real Red; Neenah Classic Crest White
Ink: Memento Tuxedo Black; SU Barely Banana, Real Red
Other: Spellbinders oval dies and label die, Prismacolor Markers
Monday, August 3, 2009
In the Salt Lake City, UT Area?
FYI:
Open House ~ 10:30 am to 2:30 pm
Margot’s Place
2793 E Cherry Lane, Layton, 84040
801-547-9435 or 801-663-6995
Just for fun we will be having door prizes and treats!
(and of course a little make-n-take)
Items for sale will be cash and carry (checks accepted too!). No holds. What isn’t sold on Saturday will be listed on Ebay, so make an offer – you never know!
Please feel free to pass this sale notice along to any of your friends who might be interested.
Subscribe to:
Posts (Atom)