Pages

Showing posts with label The Slice. Show all posts

Thursday, December 24, 2009

It's almost here!

It's 6 AM on Christmas Eve as I type
this. We are having our big family dinner and gift exchange today because our oldest son is a chef and will be working tomorrow. I can't wait to see my husband's expression when he discovers the big surprise I have for him. I am so excited! And NO, all you comedians out there, I am NOT pregnant!

Here are the last of this years cards. This first group features stamps from Waltzingmouse. Upper left: cardstock & ink from StampinUp; paper from Basic Gray; Cuttlebug dotted swiss and holly border embossing folders; icycle border punch from martha Stewart. I began the center piece by stamping the Waltzing mouse Labels4 stamp onto Craft-a-Board, stamping the sentiment inside, cutting and embossing with Spellbinders Labels Four die, dusting the edge with pale green ink then glue and finally adding the Twinklets Diamond Dust. The icicles were also coated in glue and Diamond Dust.
Center Right: Stamps from Waltzingmouse; paper by Basic Gray; Cardstock & ink by StampinUp; Spellbinders Star die; Craft-a-Board; Tsukineko Frost White All Purpose Ink; ribbon & button from stash.
Bottom Left: paper & lace from Webster's Pages; ribbon from Ellen Hutson; cardstock & ink by StampinUp; stamps by Waltzingmouse; Gold embossing powder from JudiKins; Prismacolor markers; Peeled Paint Distress Ink.

This final group were all inspired by Ellen Hutson and use paper and trims from Webster's Pages and cards with matching envelopes from Memory Box. Additional products used (clockwise from upper left): Angel Stamp unknown, sentiment from Papertrey Ink, ink from StampinUp; Joy to You stamp from Hero Arts, Bramble Wreath from Memory Box, ink & cardstock from StampinUp, Stickles Glitter Glue, Distress Ink, Spellbinders Labels Three; Peace from PSX, cardstock, ribbon & ink from StampinUp, border punch from Fiskars, Glitter by Stampendous, Spellbinders Labels Five die, Distress Ink; Doves stamp by PSX stamped with Memento Tuxedo Black and colored with Prismacolor markers and a white gel pen, Stickles Glitter Glue, Spellbinders Deckled Rectangles die. Both the Angel and Dove cards also have a border drawn with a Prismacolor Metallic Gold marker.

I hope to be able to post my 12 Days of Christmas Tags starting with Day One tomorrow but I'm not making any promises. The plan is to use my Slice and the Mistletoe Design Card as well as leftover papers and trims, various glitters and Tim Holtz finishes to commemorate each day from Christmas to Epiphany. Let's see if Life cooperates.

Wishing you all a very Merry, Peaceful and Blessed Christmas.
Til next time...

Thursday, November 19, 2009

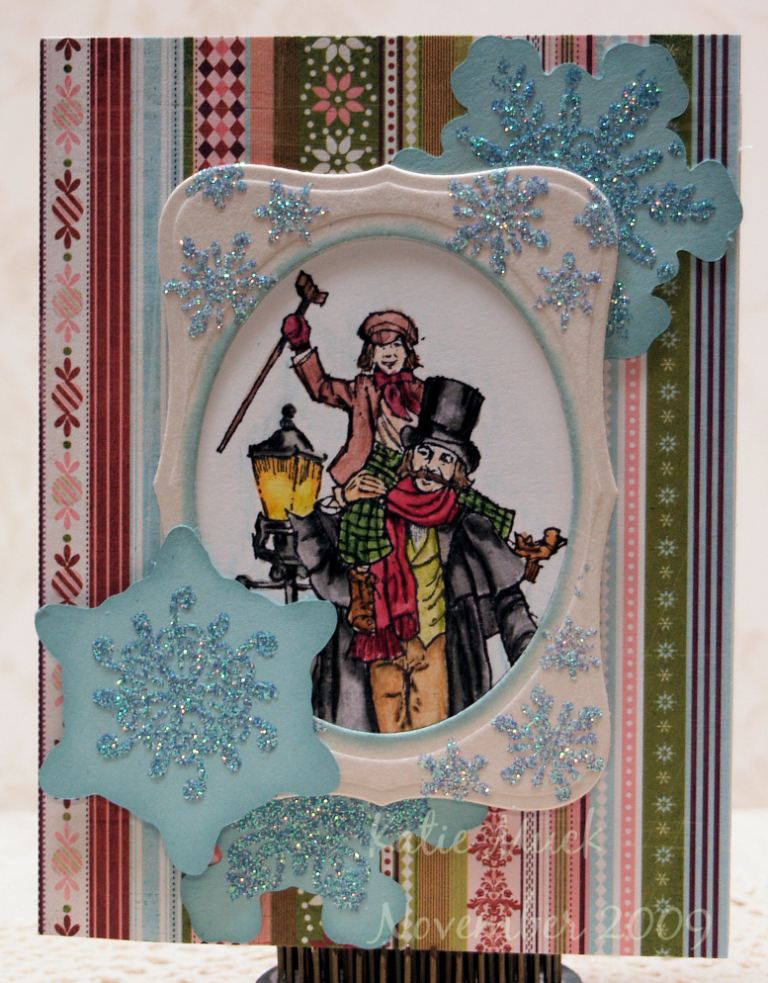
A Dickens of a Time

I had a card all planned in my head. I would stamp snowflakes, cut them out, add glitter and use them as embellishments. It was going to be a great card except my hand wouldn't cooperate so I couldn't cut the snowflakes out. I have a Slice but the snowflakes are lacy so I couldn't stamp on them or so I thought. Then I remembered that Mistletoe is a new MS+ design card which means that I can cut shadows with it. Oh how I love my Slice and my hands do too.
I cut 3 different snowflake shadows in the 2 inch size from the Soft Sky cardstock, stamped the snowflakes with the Glue Pad, placed them face down on the glitter and then ran a 2 inch brayer over them to make sure the glitter was well smashed into the glue.
I cut and embossed the frame out of Ellen Hutsons Craft-A-Board using the Spellbinders dies, sponged some Soft Sky ink around the oval opening, stamped with the glue pad and smashed into the glitter.
I stamped my focal point onto the Neenah Classic Crest with Archival Ink. Once it was completely dry I colored with my watercolor pencils then used my aquapainter to blend the colors.
When doing the final assembly I used a few dimentionals here and there to keep everything level where necessary .

Til next time...

Stamps: SU Keep Christmas, Serene Snowflakes, Winter Post

Paper: Basic Grey 6x6 Paper Pad (Eskimo Kisses); SU Soft Sky; Ellen Hutson Craft-A-Board; Neenah Classic Crest Natural White

Ink: SU Soft Sky; Archival Jet Black

Other: Making Memories - Slice, Mistletoe Design Card; Spellbinders - Labels Eight, Plain Ovals; The Essential Glue Pad; Blue Pastel Glitter (?); Staedtler Karat Aquarelle Watercolor Pencils; Aqua painter

Saturday, October 31, 2009

Emboss Resist

September's Card Club Technique was Emboss Resist. For the technique, we rolled the Stamping Wheel in Versamark, rolled it onto Glossy cardstock,embossed with clear embossing powder,brayered on black ink then wiped off excess ink with tissue.
To complete the card, the sentiment was stamped with black ink on a piece of Dusty Durango which was then mounted to a piece of Going Gray. I dusted with edges with Basic Gray then attached 2 black brads near the bottom. The Haunted House was stamped with Black ink on a piece of Basic Gray then colored with Watercolor crayons and an Aquapainter. The edges were dusted with Basic Gray then the piece was mounted to a piece of Going Gray that was dusted with basic Gray. The tree with owl was stamped 3 times across the top of the card with Basic Gray ink.

To complete the technique page I stamped a background in Basic Gray using stamps from Inkadinkadoo and dusted the edges with Basic gray. The spider web and haunted house were cut using the Spook Alley Design card in my Slice. The instruction piece was dusted with Lovely Lilac.


Til next time...


Stamps:SU-Haunted Hill Wheel, House of Haunts set; Inkadinkadoo
Ink: Versamark, Basic Black, Basic Gray, Lovely Lilac
Paper: Basic Gray, Going Gray, Lovely Lilac, Basic Black, Barely Banana, White,
White Glossy, Dusty Durango
other: Clear Embossing Powder, Brads, Paper Piercer, Brayer, Watercolor Crayons,
Aquapainter, SU Black Grosgrain, The Slice, Spook Alley Design Card.

Sunday, September 20, 2009

Back in the Saddle

It has been 3 weeks since my last post and I need to pick myself up and get going again. Life is too short to waste and Shirley would tan my hide if I stayed in my shell any longer. To jumpstart this blog I am reposting the card I made for her family with details this time.


The floral vine is from a gorgeous set by Papertrey Ink called With Sympathy. The butterfly is from a Verve set called Enjoy and the sentiment is from StampinUp. Shirley loved Pink or Peach with green so that was my color scheme.

The cardstock I used was SU's Blush Blossom, Always Artichoke and Groovy Guava as well as Neenah's Classic White. I stamped the vine with SU's Always Artichoke and the flowers with Dusty Durango then colored with Prismacolor markers.

The label was cut from Blush Blossom using Making Memories Slice and the Studio Essentials design card. I stamped the sentiment in Always Artichoke, dusted the edges with Blush Blossom and attached the label with crystal brads that were colored with a Prismacolor marker. The butterfly was stamped with Groovy Guava, Dusty Durango and Chocolate Chip then cut out. I stamped the antennae in Chocolate Chip directly onto the card front then mounted the butterfly in place with Dimentionals.


I have a handful of cards and things that I have worked on over the last few weeks that I will be posting over the next week or so. Several sketch challenges from Splitcoast and Verve, 2 technique pages from this years Stamp Club as well as the projects from Stamp Club. Hope you come back.

Til next time...

Tuesday, April 28, 2009

Slice Masks

When I've had the time to play these last 6 or 7 days, I have been working with my Slice. I was not very happy with this product when I first took it out of the box. The blade pressure was very finicky and so many of the cuts did not have the detail that the example showed. In fact, some of the designs were strangely distorted. I was rather disappointed but after spending so much money, I was determined to get this thing to work.

Last Monday I received an updated Basics 1 Design Card and on it was a Calibration Program. After running this program I put my Slice to the test. I cut random letters and shapes in small, medium and large sizes and compared them to what I had cut previously and with the samples in the design guide. What a difference! So now that my Slice was running more to my liking I was ready to try something that has been on my mind for a while.

I enjoy making my own backgrounds and I really enjoy doing the more artsy style even though I have gotten away from it. With this in mind I decided to cut my own masks using the Slice and Masking Magic by Therm O Web. I removed the backing from the Masking Magic and smoothed the masking material onto my clean cutting glass. There is no need to have low tack adhesive on the cutting glass since the Masking Magic is already self stick and low tack. I chose a few designs from the Basics 3 design card, cut them out and then applied them to some ivory cardstock.

Using my ink applicator and Distress Ink, I applied ink all over the cardstock then removed the 2 smallest masks and stamped the piece with French Script background in Soft Gold Shadow Ink. Once that was dry I removed the remaining masks then stamped in dark shades of the 2 main colors with assorted stamps that went well with the masks. Finally, I ruined it by stamping with a Frame and Sentiment stamp that wasn't bold enough to stand out from the background.

Oh well - Live and Learn. But of course I'm not one to give up so I went back, sponged some white craft ink around the sentiment and frame then restamped it.

My second background was done basically the same but I stamped a Harlequin pattern over all then removed all the masks before stamping the French Script.

Since doing this project I discovered that I can't find any more Masking Magic at my usual haunts so I am going to pick up some Eclipse Tape by Judikins and see if it works the same.

Thursday, March 19, 2009

What happened to March? Part 1

On March 1st I went to The Kura Door, which is a Holistic Japanese Spa in Salt Lake. I was finally collecting on my Christmas gift from the 2 Labradors I "Puppy Nanny" for. I had a full body massage and a pedicure and it's been downhill ever since! From then until now I have spent hours and hours in front of the computer doing work for my husband - Visio diagrams, Powerpoint Presentations, converting VHS to digital, etc. etc. I also spent days doing the taxes for his LLC so I could finally do our taxes and we owe everyone! Blagh!!

2 whole days were wasted fighting with my Slice!! Apparently it is very finicky and does NOT like StampinUp cardstock! I've spent too much money on this system to give up on it and the concept is perfect for the way I work so I do hope Making Memories fixes the bugs in this thing.

It hasn't been all work and no play. We've had dinners with our son Alex and his wife Emily. We went to the Mikado for Japanese. NOT the best I've ever eaten but watching Christopher eat with chopsticks was Very entertaining. Last Saturday we had Texas Roadhouse. Good food, good beer, those rolls are wonderful and a fantastic time followed by a fun time in the hottub.

Chef Chris (our oldest son, Christian) is getting ready for a competition so he has practiced on us twice so far this month. He's a really good cook and makes the MOST KILLER sauces in the world. The first time he came to practice his wife Kristina was out of town but she was able to join us Sunday. More good food, good wine, plenty of laughs followed by more hottubbing.

Stay tuned for Part 2 which actually includes some stamping I managed to squeeze in.