Til next time...

Showing posts with label Cool Products. Show all posts
Showing posts with label Cool Products. Show all posts
Sunday, November 16, 2014
Discover Bister
Bister is a concentrated color wood stain from the Netherlands. It comes as a granular, water soluble powder in 8 colors and can be purchased from I Brake for Stamps. All the information I found on the internet was in Dutch so in this video I explore how the product reacts with other art mediums.
Til next time...
Til next time...


Wednesday, July 16, 2014
Week 2 Art Journal
Yes I know I'm running behind. I wish I knew how other people can cook, clean, do laundry, medicate a sick dog, care for an old man, feed and water dogs, cats & chickens, make jam, create artwork, photograph it and get it blogged without getting behind. I haven't even looked at this weeks projects. Oh well, fortunately Camp Scrap is all recorded and should keep me busy for months.
Anywhoway... Last weeks Art Journal Project was to a) Use just one color b) Be inspired by a single shape and c) Use something from around the house. I did 2 of the 3. I couldn't think of a single thing around the house that I could use.
I chose hexagons because they remind me of chicken wire (I'm obviously obsessed with all things Chicken) and bees. The shades of yellow just seemed to go with the honey bee theme so I went with it.

In order of execution:
P.S. If you read my last post, the UmWow mask did give me a sharper, higher profile with the embossing paste that I really like on this piece.
Til next time...
Anywhoway... Last weeks Art Journal Project was to a) Use just one color b) Be inspired by a single shape and c) Use something from around the house. I did 2 of the 3. I couldn't think of a single thing around the house that I could use.
I chose hexagons because they remind me of chicken wire (I'm obviously obsessed with all things Chicken) and bees. The shades of yellow just seemed to go with the honey bee theme so I went with it.
In order of execution:
- Apply book page to mixed media paper with matte medium
- Gesso the whole page
- Randomly stamp hexagon outlines (Papertrey Ink & StampinUp)
- Mask previously stamped hexagons
- Randomly stamp patterned hexagons all over page and emboss with clear embossing paper. (Papertrey Ink and StampinUp)
- Airbrush with Copic markers starting with lightest shade of yellow in upper right corner, working down towards lower left corner using medium shade and ending with darkest shade.
- Use Tim Holtz Honeycomb stencil and alcohol dampened applicator to remove some ink here and there.
- Use alcohol and cotton swabs to remove excess ink from embossed hexagons
- Remove masks, journal in and around white hexagons and stamp a few bees (PITT pen, StampinUp bees)
- Using UmWow's hexagon confetti mask, apply a mix of white and gold embossing paste here and there (Dreamweaver, Wendy Vecchi)
- Stamp, die cut, color and embellish large bee and mount in lower corner. (StampinUp bee and die, Copic Markers, Glossy Accents, Donna Salazar Pralines & Cream glitter
P.S. If you read my last post, the UmWow mask did give me a sharper, higher profile with the embossing paste that I really like on this piece.
Til next time...
Monday, July 14, 2014
An Um Wow Imp
There is an art journaling blog and YouTube channel that I've been following called Imperfect Impulses with Aaron so I guess that makes me one of his Imps. I love this guy - his techniques, his style, his videos as well as his personality. And he likes Lady Gaga so all in all he is just about perfect. There is just one tiny, little problem. He has been costing me money. In a recent video Aaron used some masks and doodads from Um Wow Studios that I just had to have.
 UmWow has all kinds of laser cut chipboard from the tiniest Confetti Collections up to tag books. I tried to restrain myself but the confetti packages were just so tempting. I ended up ordering 7 packages of confetti. They are supposed to be chipboard but look like wood. They can be stained, painted, stamped on, heat embossed and probably things I haven't thought of yet. I do have to warn you though - these are laser cut so there is soot on them. Don't drop them on anything light that you want kept clean and wipe your hands after handling.
Diamonds: Solids as small as 1/8 inch up to 5/8 and frames from 3/8 up to 1 inch.
Chevrons: Solids and frames from about 3/8 to 1 inch
Octagons: Solids and frames from less than 1/4 up to about an inch.
Snowflakes: 1/8 to 1 inch
Gear Mash: The smallest is about 3/8 and the 2 largest are 1 1/2 and 2 inches.
Arrows: Every type imaginable!
Love Confetti: Hearts, tags, lips, people, X&O, and arrows in assorted sizes.
 UmWow's masks are a bit thicker than most of the other masks and stencils I have which should give me a higher profile when using embossing paste. They are also a bit stiffer so I am wondering if I will get a sharper image when sponging or spritzing. The five that I chose for my first haul are: Brick, Butterfly Swarm, Diamond Confetti, Hexagon Confetti, and Star Confetti. Can't wait to use these!
Plan on seeing these products from UmWow in future projects. I already have a partial order ready to go and I haven't even used this stuff yet. Is there a 12 Step Program for this?
Til next time...
Diamonds: Solids as small as 1/8 inch up to 5/8 and frames from 3/8 up to 1 inch.
Chevrons: Solids and frames from about 3/8 to 1 inch
Octagons: Solids and frames from less than 1/4 up to about an inch.
Snowflakes: 1/8 to 1 inch
Gear Mash: The smallest is about 3/8 and the 2 largest are 1 1/2 and 2 inches.
Arrows: Every type imaginable!
Love Confetti: Hearts, tags, lips, people, X&O, and arrows in assorted sizes.
Plan on seeing these products from UmWow in future projects. I already have a partial order ready to go and I haven't even used this stuff yet. Is there a 12 Step Program for this?
Til next time...
Wednesday, August 31, 2011
Playing Catch Up
I've been trying to photograph some cards to post to the blog but have been running into a problem or two. Miss Maddie just has to be right in the middle of things.


I have finally managed to get it done so will be posting them over the next few days. In the meantime, I thought I'd show you my nifty neato dauber cases I just got from Scrapbook.com. I LOVE these cases!!!

They hold 40 daubers so I have all my StampinUp core colors in one and the In Colors, Shimmer Paint, spare daubers etc. in the other. Being organized makes this textbook Virgo a very happy camper.
Til next time...


I have finally managed to get it done so will be posting them over the next few days. In the meantime, I thought I'd show you my nifty neato dauber cases I just got from Scrapbook.com. I LOVE these cases!!!

They hold 40 daubers so I have all my StampinUp core colors in one and the In Colors, Shimmer Paint, spare daubers etc. in the other. Being organized makes this textbook Virgo a very happy camper.
Til next time...
Wednesday, December 23, 2009
Laid Back Christmas
 I've taken things very slow and easy this year. I saw no point in making my hands hurt worse than they do so I eliminated many things from the schedule and really enjoyed the things I did manage to do. One of the things I really enjoyed was making my Christmas cards. I only made 2 a day and didn't stress over them. They became the highlight of my Christmas preparations - that and online shopping.
In this first group, the upper left card was made with paper from American Crafts; cardstock, ribbon, ink and ornament stamps by StampinUp; Cuttlebug border embossing folder; Label 4 stamp and sentiment by Waltzingmouse Stamps; Spellbinder's Label 4 die; gold thread.
The bottom left card uses paper from Cosmo Cricket; cardstock, stamps, ink, paper punches and label die by StampinUp; Cuttlebug embossing folder; gold thread; All Purpose Ink in Champagne Mist by Tsukineko.
The final card in this group features a frame cut from Ellen Hutson's Craft-a-Board using a Spellbinder's die which was then sponged with Champagne Mist All Purpose Ink. The deer is a stamp from All Night Media that I have had for years. Other products used were: embossing folder, cardstock, ink, and sentiment from StampinUp; paper from Basic Gray; ribbon from stash.

In this second group, starting with the card on the left, I have a very quick and easy card made using paper and a matching brad from Bo Bunny Press. The cardstock, ribbon, ink, stamp, paper punch and border punch are from StampinUp and the larger scalloped circle punch is from EKSuccess.
The card on the upper right features scoring on the Scor-Pal and a buckle from a Spellbinder's die accented with a Stardust pen. Cardstock, red & green inks, stamps and ribbon are from StampinUp; Spellbinder's large and small oval dies; Antique Linen Distress Ink.
The final card in this trio uses the Dotted Swiss embossing folder from Cuttlebug; Labels Two dies from Spellbinders; Stickles Glitter Glue; Prismacolor Markers; trees from HeroArts; Memento Rich Cocoa Ink; Green Ink, sleigh, sentiment, holly border, oval punches and cardstock from StampinUp.
Til next time...
Thursday, November 19, 2009
A Dickens of a Time
I had a card all planned in my head. I would stamp snowflakes, cut them out, add glitter and use them as embellishments. It was going to be a great card except my hand wouldn't cooperate so I couldn't cut the snowflakes out. I have a Slice but the snowflakes are lacy so I couldn't stamp on them or so I thought. Then I remembered that Mistletoe is a new MS+ design card which means that I can cut shadows with it. Oh how I love my Slice and my hands do too.
I cut 3 different snowflake shadows in the 2 inch size from the Soft Sky cardstock, stamped the snowflakes with the Glue Pad, placed them face down on the glitter and then ran a 2 inch brayer over them to make sure the glitter was well smashed into the glue.
I cut and embossed the frame out of Ellen Hutsons Craft-A-Board using the Spellbinders dies, sponged some Soft Sky ink around the oval opening, stamped with the glue pad and smashed into the glitter.
I stamped my focal point onto the Neenah Classic Crest with Archival Ink. Once it was completely dry I colored with my watercolor pencils then used my aquapainter to blend the colors.
When doing the final assembly I used a few dimentionals here and there to keep everything level where necessary .
Til next time...
Stamps: SU Keep Christmas, Serene Snowflakes, Winter Post
Paper: Basic Grey 6x6 Paper Pad (Eskimo Kisses); SU Soft Sky; Ellen Hutson Craft-A-Board; Neenah Classic Crest Natural White
Ink: SU Soft Sky; Archival Jet Black
Other: Making Memories - Slice, Mistletoe Design Card; Spellbinders - Labels Eight, Plain Ovals; The Essential Glue Pad; Blue Pastel Glitter (?); Staedtler Karat Aquarelle Watercolor Pencils; Aqua painter
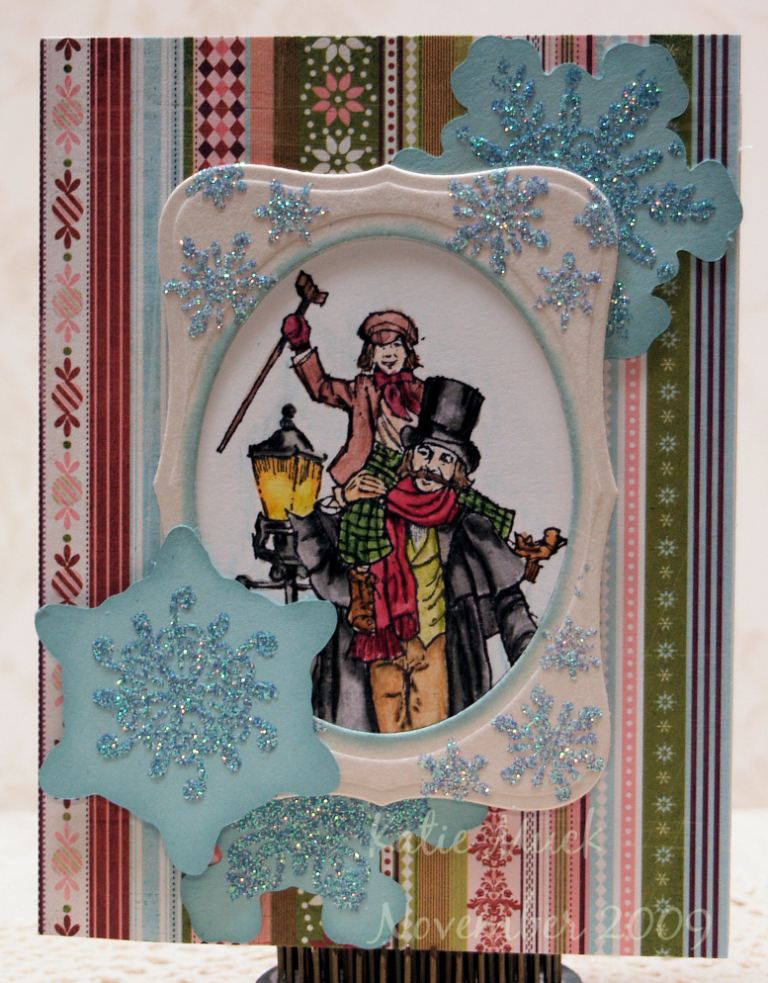
I cut 3 different snowflake shadows in the 2 inch size from the Soft Sky cardstock, stamped the snowflakes with the Glue Pad, placed them face down on the glitter and then ran a 2 inch brayer over them to make sure the glitter was well smashed into the glue.
I cut and embossed the frame out of Ellen Hutsons Craft-A-Board using the Spellbinders dies, sponged some Soft Sky ink around the oval opening, stamped with the glue pad and smashed into the glitter.
I stamped my focal point onto the Neenah Classic Crest with Archival Ink. Once it was completely dry I colored with my watercolor pencils then used my aquapainter to blend the colors.
When doing the final assembly I used a few dimentionals here and there to keep everything level where necessary .
Til next time...
Stamps: SU Keep Christmas, Serene Snowflakes, Winter Post
Paper: Basic Grey 6x6 Paper Pad (Eskimo Kisses); SU Soft Sky; Ellen Hutson Craft-A-Board; Neenah Classic Crest Natural White
Ink: SU Soft Sky; Archival Jet Black
Other: Making Memories - Slice, Mistletoe Design Card; Spellbinders - Labels Eight, Plain Ovals; The Essential Glue Pad; Blue Pastel Glitter (?); Staedtler Karat Aquarelle Watercolor Pencils; Aqua painter
Subscribe to:
Posts (Atom)