Pages

Tuesday, October 28, 2014

Finding My Style

Being fairly new at Mixed Media, I find that I spend a lot of time reading blogs and watching videos of Mixed Media Artists. This is how I learn what products are out there, what techniques the experienced artists are doing and hopefully I can use what I learn to develop my own style and find my own little niche.  This piece was inspired by Vivian AKA contadinaK and this video she posted on YouTube.

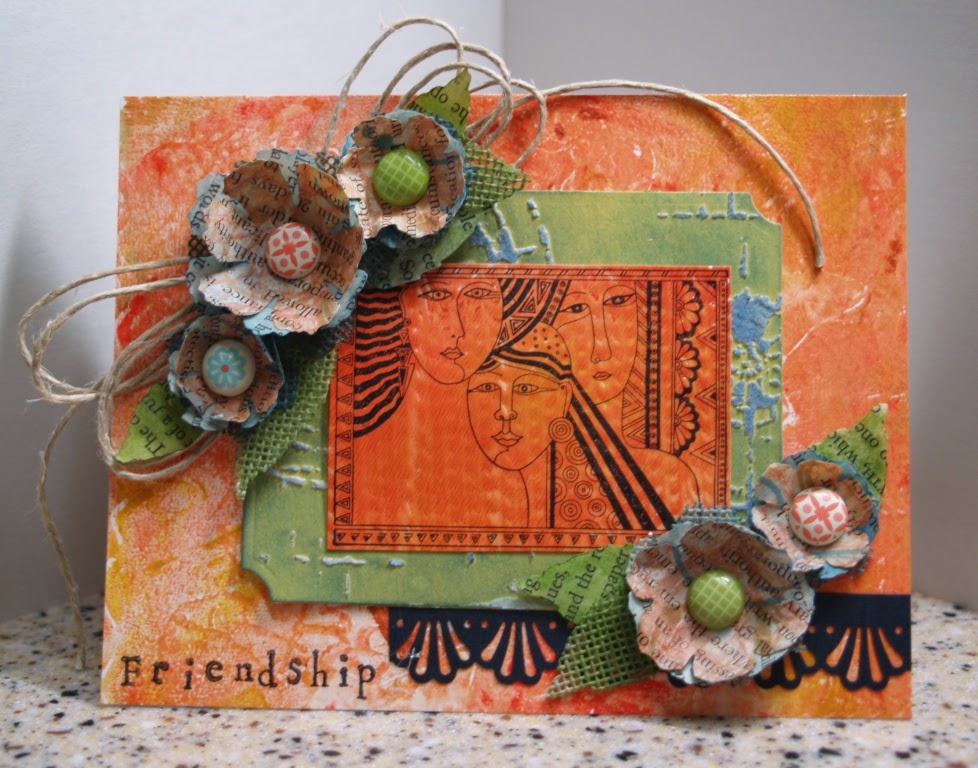
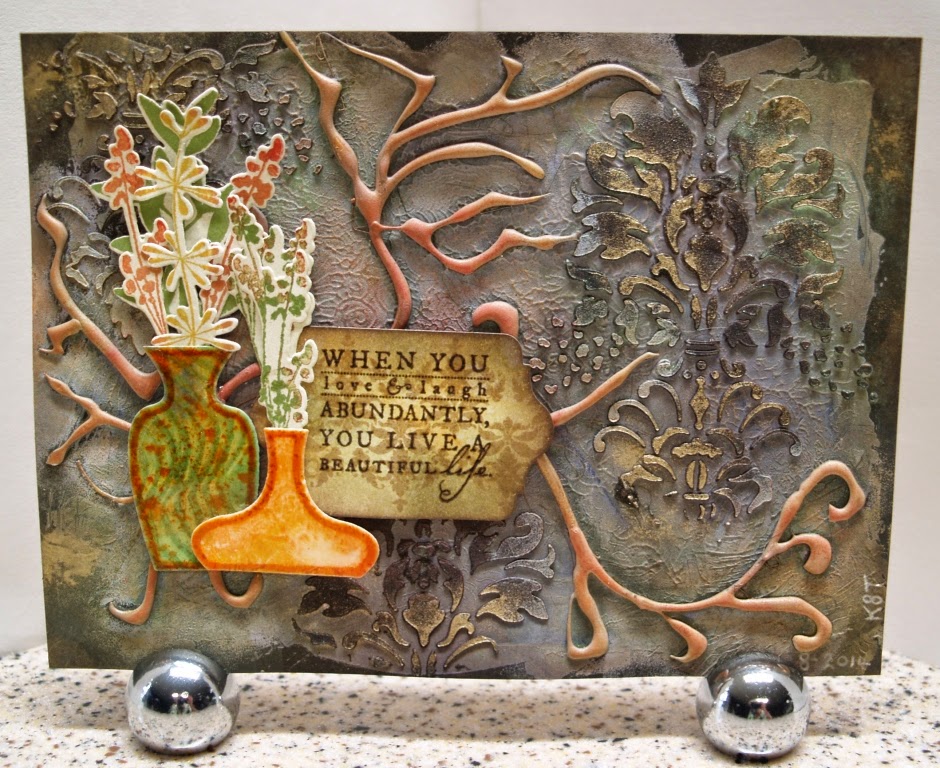
I started by spreading white gesso on a piece of mixed media paper with a palette knife but I didn't cover the whole page.  While the gesso was still wet I pressed into it randomly with an old rubber stamp. Next came embossing paste through a Damask stencil from UmWow Studio followed by random swirls of hot glue that were sponged with gesso once cooled.

Now that all the base texture was done I sprayed the page with Dylusions in Chopped Pesto and Slate Grey. I added poofs of PearlEx in Gold and Interference Green as I was spraying so the Dylutions would spread the powder and act as a fixative.

Once everything was dry I added Colorbox Chalk Inks from the Autumn Collection to the gessoed hot glue. Unfortunately it looks like a scene from "The War of the Worlds". I hid most of it by stamping and cutting 2 vases from some scraps of monoprinted paper using stamps and matching dies from Papertrey Ink then coating them with 2 layers of UTEE. The flowers were stamped with PTI's Larger Than Life set and die cut. The label was cut with a die from StampinUp's Chalk Talk set, stamped with PTI's Damask Designs then aged with Distress Inks. The sentiment from PTI's Meadow Greens set was stamped with Walnut Distress Ink and embossed with clear powder. The label and vases were mounted over the hot glue disaster with foam tape.

Til next time...

Wednesday, October 22, 2014

WOYWW October 22

Well my workdesk is rather boring today as I am in between projects. There are mostly remnants of a organizing project I did off and on for the last few days. I have an old Quickutz cabinet that really wasn't living up to its potential so I made 3 x 3 x 4 1/2 boxes to fit in the cubbies. Made some labels with my Brother P-Touch and now have storage for some odds and ends that needed a place to hang out.


Til next time...

Wednesday, October 15, 2014

City On The River

I managed to not only create a new Art Journal page but filmed the process, edited the video, added the narration and uploaded it to YouTube. Pretty impressive especially considering I'm really new at most of this. I apologize for the sniffling during the second half. We had tremendous winds today and since Utah IS in the desert, my furniture is now crunchy with sand and my nose is running. At least I didn't have a sneezing fit. Those can last for several minutes when the air is really bad.

This will be my last video with the Sony camera. The resolution is only 420 or so with the Sony which was pretty good 8 years ago but I splurged and got a Panasonic HC-V550 HD Camcorder. Can't wait to play!

So any who way, here is the video...


Enjoy!

Monday, October 13, 2014

Gel Plate Monoprinting

Ran across a video here on how to make a permanent gel plate for monoprinting and decided to give it a whirl. It wasn't all that cheap to make, smelled a bit funky, foamed like a son of a gun and had to be skimmed repeatedly to get rid of all the foam but it did work.  I still have it in a container at room temperature and it hasn't grown anything but it is a pain to clean and I think a silicone glue gun mat will work just as well.

So there I was with several sheets of cardstock printed in some not so great colors but went ahead and used them anyway. I had a print that was made by brayering red, orange and ochre paint on the plate and then stamping into the paint with a damp marble design stamp. I cut it down and made a 4 1/4 by 5 1/2 inch card with it.

The second print started out yellow and blue but I overworked it and ended up with green. A little embossing paste, a stencil from The Crafters Workshop and Salty Ocean Distress ink on a 3 1/4 by 4 1/2 inch ticket die cut made it work.

The next print was red and orange paint that was combed with a rubber thingy for doing wood graining. I used black Archival Ink and a stamp I lovingly refer to as "The 3 Broads" from my ancient stash. No idea who made the stamp. It's really old and just bare rubber.

Flowers were die cut from the Tim Holtz Tattered Floral Garland decorative strip. Papers used were: a book page randomly stamped with Ripe Persimmon Distress Ink; book page sponged with Salty Ocean and ironed with paraffin wax; book page sponged with Peeled Paint Distress Ink; a piece of needlepoint canvas sponged with Peeled Paint Distress Ink and a second piece sponged with Salty Ocean.

A strip of black cardstock punched with a Martha Stewart border punch, decorative brads from StampinUp and a bow made from hemp cord complete the embellishments. The final touch was the word "Friendship" stamped in black Archival ink with alphabet stamps from Hero Arts.

Til next time...

Saturday, October 4, 2014

Testing 1 2 3 ...

I have been wanting to try recording some How-To videos for some time now but didn't know where to start. After watching this video from Imperfect Impulses and this one from Sheepishly Sharing I discovered that I had all I needed except experience so thank you Aaron and Margaret. I have already learned a lot just with this one test video - my resolution is too low, picture is out of focus most likely due to having the camera too high overhead, it's probably better to just do my project and narrate the process later and I need to stop waving my hands around since I'm Polish not Italian. (grin)

So anyway, here is my test run. Try not to laugh too hard and any and all advise will be greatly appreciated. My camera is a Sony DCR-DVD205 mounted to my old but trusty Velbon tripod and I'm using Roxio Creator 2011 as my video editor.


Til next time...